A new gallery of textured photographs has been added to the website.
Subscribe to Blog via Email
Join 12 other subscribers
When I first set up my WordPress site, I was excited to learn that I could have several header images which would change every time a new page was viewed. But over time I realized that some of the banners did not go well with certain pages so I reverted back to a single header image.
At the same time, I always wondered what the featured image setting was for. I had tried setting up images as featured but it had no effect on how the pages were displayed. After a little research, I discovered that this function was to enable a featured header image for the page – just what I had been looking for. All you have to do is make the header images you want, taking note of the header size that your theme requires. On my website my Twenty Ten theme requires a header size of 940 x 198 pixels.
The next step is to upload the new headers you just made into the image library. Then edit the page you want to change. Click on the set featured image button and the image library will open. Select the header you want to use for that page and then click on the set featured image button. Next click on the blue updated button on your the page you are editing and you are done. Sounds complicated but its a really simple way to customize your website and blog and add visual interest that relates to the subject on your page.
 Believe it or not, there are still some people who feel that digital photography is not art. Although their numbers have been dwindling, they are still out there. Some are “old school” darkroom workers who process their black and white film and make their own prints in a traditional wet darkroom. Others are involved in the art world in some other way such as writers, academics, gallery owners, museum directors, etc. Of course, similar arguments still resurface on the topic of whether photography itself is art or not.
Certainly, they are entitled to their opinions on this. Perhaps they feel that because the images are edited on a computer in software programs such as Adobe Photoshop, that such activities constitute manipulation and are not as valid as those made in more traditional modalities.
Its funny how we all tend to cling to old beliefs. In fact, if truth be known, I used to be one of the darkroom purists when digital cameras first emerged on the scene. I would get angry if anyone would suggest that digital had a place in fine art photography and emphatically stated that I would never do that. Then a couple of years later, I purchased my first digital camera, a 4MP E-10 made by Olympus. I justified the purchase by saying that I was only using it as a “sketchbook” and that I would continue with my real fine art film photography. But as time went on, the film camera spent more time in the trunk of my car while I explored the world with the E-10 digital.
Eventually, I stopped bringing the film camera with me and also realized that I was taking many more pictures than I ever had before. Some of them were actually better than what I had done previously with film. Digital made it easy to take more pictures, have immediate feedback, learn from my mistakes and grow as an artist.
At the same time, I was having back and neck problems. It was becoming more and more difficult to stand on the hard basement floor bent over the darkroom sink or enlarger for long periods of time. I started taking classes at a local Community College, learned Photoshop, Illustrator and other electronic imaging programs. I now work solely in my digital darkroom for photography but also dabble in drawing and painting.
Are digital photographs manipulated? Of course they are to one degree or another. But so is traditional photography. The choice of film, developer, filters, lens focal length, paper grades, chemistry are all forms of manipulation. Choosing the moment to click the shutter, camera position, time of day, what to include and exclude in the frame, juxtaposition and composition are as well.
Perhaps what some people are finding objectionable is the over-manipulation that is so prevalent in some digital photos. I’m talking about the over-filtered, over-saturated, HDR grunge look that has become popular amongst some practitioners as an example in point. But digital photography is simply another medium. And just like oil, acrylics, pastel, charcoal, graphite and film, it can be done well or poorly. Its the final image that is important and not the process or tools by which it was made.
Photomontage is the art of creating a new image by combining two or more photographs. It has been practiced throughout the history of photography. Contemporary artist Jerry N. Uuelsman actually employs several enlargers in a traditional wet darkroom to create his surreal images. Others have sandwiched negatives together during printing.
With the emergence of digital cameras and editing software such as Adobe Photoshop, the practice is used in a variety of venues including graphic design, illustration and fine art. John Paul Caponigro and Erik Jonannson are well known photographic artists who combine images in the digital realm. There are many others as well.
The practice requires employing images that work well together. They usually need to be compatible in terms of contrast, color, direction and quality of lighting, etc. There are a variety of techniques that are useful for combining images. These include selection, layer masks, layer blending modes and opacity settings. I suppose the eraser tool could also be included in this list but I prefer to avoid using methods that are non-recoverable.
Sometimes its simply a matter of adding visually interest to an image such as clouds or other background elements. Other times the purpose is to create a result totally different from any of the parts it was made from.
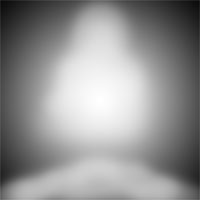
In the example below, titled Apparition I, two images are combined using a layer mask with a gradient to help control the transition from one image to the other.
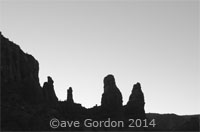
Bottom layer
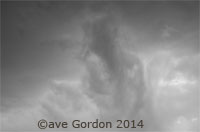
Clouds layer
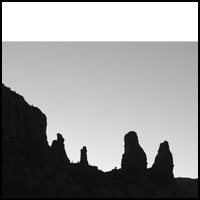
Canvas size changed to square format.
The first image of the rock formations served as the bottom layer. The canvas size of the image was changed to a square format by making the height equal to the width.

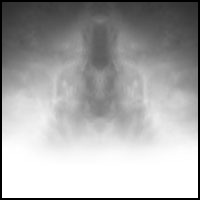
“Fog” layer
To help provide some transition, a solid white layer was placed above the first layer. A layer mask with gradient was applied. Some additional painting on the layer mask helped to control where the light “fog” layer affected the layer below.
Merged clouds layer with gradient mask.
The clouds layer was duplicated and flipped horizontally. The blending mode of the top cloud layer was changed to brighten and the cloud layers were then merged and placed above the fog layer. A layer mask with a black-to-white gradient was placed on the clouds layer to help blend it into the picture.
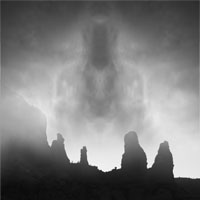
After cloud layer is added.
After the flipped/merged cloud layer is added, we are almost done. I prefer to darken the corners and draw attention towards the center of the image.
Radial Gradient Layer.
A radial gradient adjustment layer is added next. A layer mask is used on this gradient layer to limit the effect on the center and bottom portions and mostly darken the top and side corners and edges.
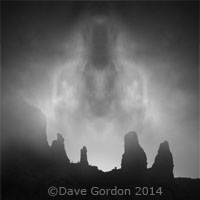
After radial gradient layer added.
This is the final image after the gradient layer has been added. Using the gradient on a separate layer allows for the use of different blending modes and opacities.
Click HERE to see some additional examples of photomontage.
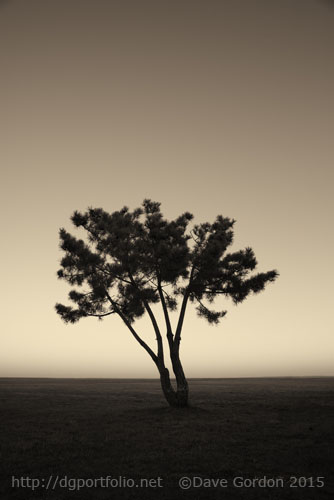 A toned monochromatic landscape photograph of a tree at twilight taken at Fort Taber in the south end of New Bedford, MA.
Click HERE for more info on this print.